[Updated 8-Nov-2021]
The next step is to create an additional management server VM from the Server 2019 template. We use the VM built in this article for an additional infrastructure server. My lab’s infrastructure VMs reside in my XenServer pool, as explained in the Introduction article. Building a server VM from the Server 2019 template was covered earlier.
From the introduction article, this is the VM we are building.
| Name | Description | IP Address |
| Lab10ZiG | 10ZiG Management Server | 192.168.1.206 |
Follow the process covered earlier to build the server above. Then, power on the VM, enter the required hostname, enter the required IP address information, and install all Windows Updates.
You may wish to download a modern browser to keep from using Internet Explorer 11. I downloaded Google Chrome.
Request Trial
10ZiG Technology provides cutting-edge Thin Clients and Zero Clients for the latest virtual desktop infrastructure solutions. Their VMware, Citrix, and Microsoft-ready hardware is designed to suit all user types, from those requiring low-level application support such as Microsoft Office, right through to power users requiring HD Video/Audio, Flash/HTML5, video conferencing, 3D, CAD, and 4K resolution.
To receive a free trial of 10Zig devices, use your internet browser and browse to https://10zig.com/ and click on TEST DRIVE OUR DEVICES, as shown in Figure 1.

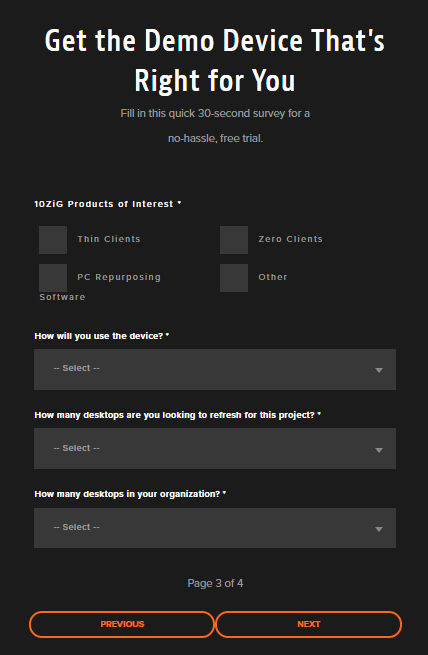
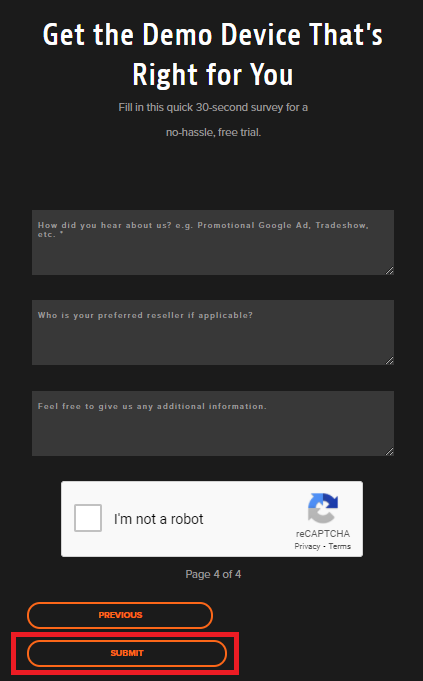
As shown in Figures 2 through 5, fill in the requested information and click Submit.


To request the download link for the 10ZiG Management Software, click FREE ENTERPRISE MANAGEMENT, as shown in Figure 6.

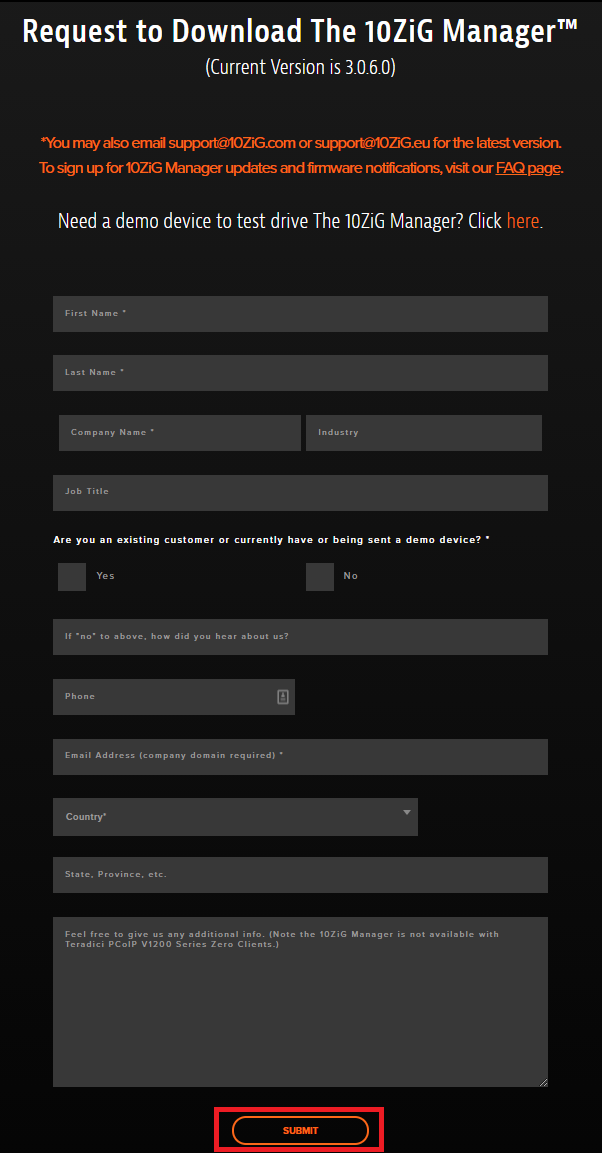
Scroll down the page, fill in the requested information, and click Submit, as shown in Figure 7.
While we wait on the email to arrive, let’s continue with work on the server.
Active Directory
We need to join our 10ZiG server to the domain.
First, we need to create an OU.
If you remember, when we created Active Directory in Part 14, I placed all my infrastructure servers in a specific OU.
Lab
Infrastructure
We place the 10ZiG server in an OU to allow for applying any required GPOs if any.
Lab
Infrastructure
10ZiG
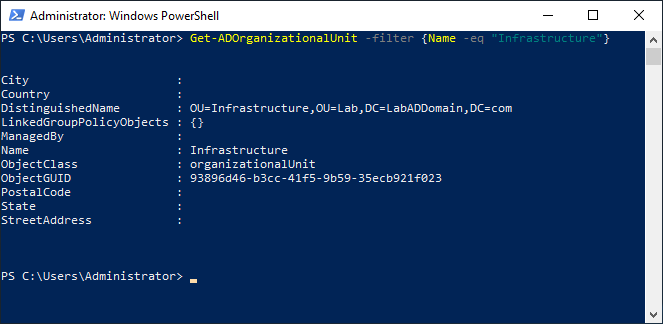
From the lab’s management computer, start an elevated PowerShell session and type in the following, as shown in Figure 8.
Get-ADOrganizationalUnit -filter {Name -eq "Infrastructure"}
Create the 10ZiG OU.
Copy and paste the following into the elevated PowerShell session and press Enter, as shown in Figure 9.
Remember to set the values you need.
Note: Lines may wrap
#create the 10ZiG OU

$ADDomain = "LabADDomain"
$TLD = "com"
$Protect = $True

New-ADOrganizationalUnit -Name "10ZiG" `
-Path "ou=Infrastructure,ou=Lab,dc=$ADDomain,dc=$TLD" `
-ProtectedFromAccidentalDeletion $Protect -verbose

Get-ADOrganizationalUnit -filter {Name -eq "10ZiG"}
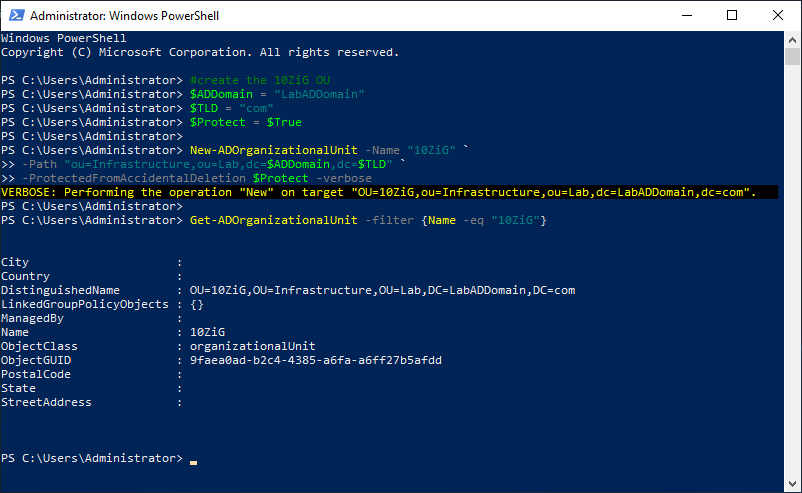
Copy the DistinguishedName property to the clipboard.
Lab10ZiG Server Work
Verify that the server has a static IP address and uses the IP addresses of the domain controllers for the DNS servers, as shown in Figure 10.

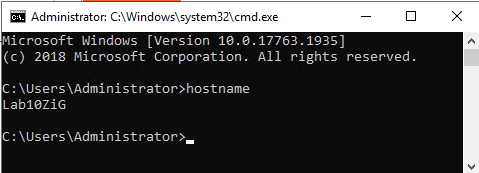
Verify that the server has the correct hostname, as shown in Figure 11.
Use mstsc to remote into the VM that is our 10ZiG server.
Exit Server Manager and start an elevated PowerShell session.
Copy and paste the following into the elevated PowerShell session and press Enter. The process took less than the blink of an eye to happen, which is why there is no screenshot.
Remember to set the values you need.
Note: Lines may wrap
#Join the computer to the domain

add-computer -Credential LabADDomain\Administrator `
-DomainName "LabADDomain.com" `
-OUPath "OU=10ZiG,OU=Infrastructure,OU=Lab,DC=LabADDomain,DC=com" `
-Force `
-Restart

#server reboots
After the VM restarts, log in using the domain’s Administrator account and password.
Now to install the server certificate from the CA.
Save the following to a file name c:\CertFiles\computer-request.inf.
I want to thank Michael B. Smith for creating this INF file for me.
Use the data needed for your environment.
Lab10ZiG                  = the name of your 10ZiG server
LabADDomain.com           = your domain name
"LabCA\LabDomain CA Root" = the name of your CA server and the name of your CA.

;----------------- computer-request.inf -----------------
; Lab10ZiG.LabADDomain.com
;
; certreq -new computer-request.inf computer-request.req
; certreq -submit -config "LabCA\LabDomain CA Root" computer-request.req computer-request.cer
; certreq -accept -config "LabCA\LabDomain CA Root" computer-request.cer
;

[Version]
Signature="$Windows NT$"

[NewRequest]
Subject = "CN=Lab10ZiG.LabADDomain.com" ; replace with the FQDN of the 10ZiG server
FriendlyName = "Computer (Machine) for Lab10ZiG.LabADDomain.com"
KeyLength = 2048
; Can be 1024, 2048, 4096, 8192, or 16384.
; Larger key sizes are more secure, but have
; a greater impact on performance.
KeySpec = 1                     ; AT_KEYEXCHANGE
Exportable = TRUE               ; private-key is exportable
MachineKeySet = TRUE            ; goes in machine store instead of user's personal store
SMIME = False                   ; cannot be used for signing S/MIME messages
PrivateKeyArchive = FALSE
HashAlgorithm = sha256          ; "certutil -oid 1 | findstr pwszName" -- gives a list (including sha1)
UserProtected = FALSE
UseExistingKeySet = FALSE       ; we are not renewing a key that already exists
ProviderName = "Microsoft RSA SChannel Cryptographic Provider"
ProviderType = 12               ; for ProviderName and ProviderType, see "certutil -csplist"
RequestType = PKCS10            ; if empty or set to "CERT" then a self-signed cert is created
KeyUsage = 0xa0                 ; 0xa0 - CERT_DIGITAL_SIGNATURE_KEY_USAGE + CERT_KEY_ENCIPHERMENT_KEY_USAGE

[EnhancedKeyUsageExtension]
OID=1.3.6.1.5.5.7.3.1 ; this is for Server Authentication - PKIX_KP_SERVER_AUTH

[Extensions]
; Note: 2.5.29.17 is the OID for a SAN extension.

2.5.29.17 = "{text}"
_continue_ = "dns=Lab10ZiG.LabADDomain.com"

[RequestAttributes]
CertificateTemplate = "Server Template"

;-----------------------------------------------
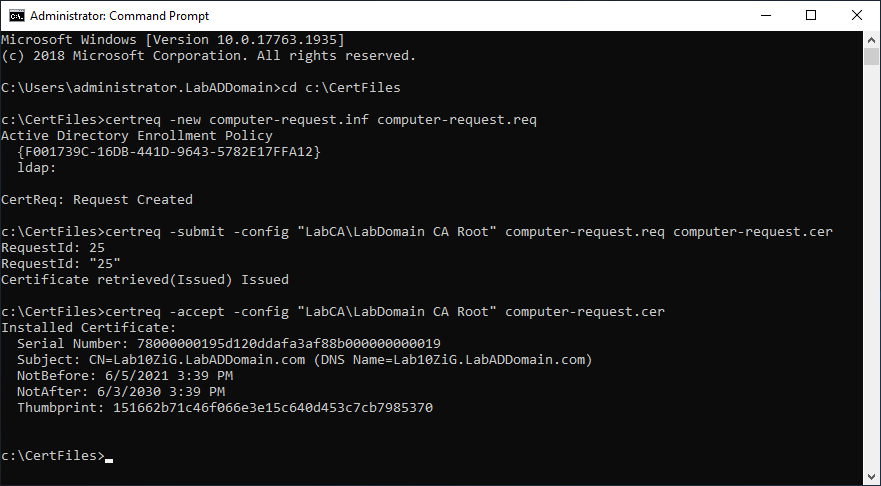
Open an elevated command prompt.
Type in cd c:\CertFiles and press Enter.
The three commands we need to run are at the top of the computer-request.inf file.
Type in notepad computer-request.inf and press Enter.
Copy the line certreq -new computer-request.inf computer-request.req, paste it in the elevated command prompt, and press Enter.
Copy the line certreq -submit -config “LabCA\LabDomain CA Root” computer-request.req computer-request.cer, paste it in the elevated command prompt, and press Enter.
Note: If you get a warning similar to the following, you can ignore the warning. The warning tells you that the certificate request validity period is past the lifetime of the CA’s root certificate lifespan.
Certificate retrieved(Issued)Issued The certificate validity period will be shorter than the Server Template Certificate Template specifies because the template validity period is longer than the maximum certificate validity period allowed by the CA. Consider renewing the CA certificate, reducing the template validity period, or increasing the registry validity period.
Copy the line certreq -accept -config “LabCA\LabDomain CA Root” computer-request.cer, paste it in the elevated command prompt, and press Enter.
Figure 12 shows the results of running the certificate request commands.
Install 10ZiG Management Console
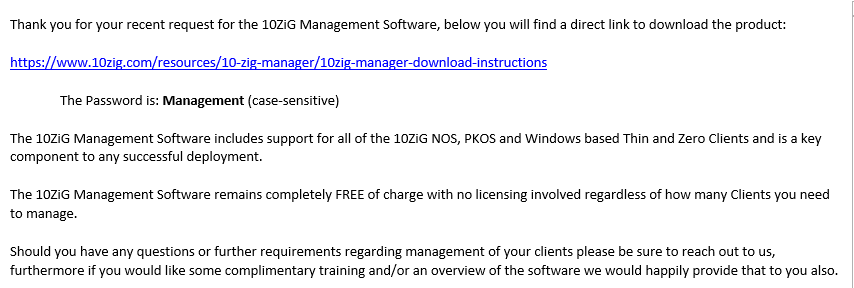
You receive an email similar to the one shown in Figure 13 to download the 10ZiG Manager software. Attached to the email is a PDF for 10ZiG Web Console Quick Start Guide.
Click the link provided in the email or browse to https://www.10zig.com/resources/10-zig-manager/10zig-manager-download-instructions.
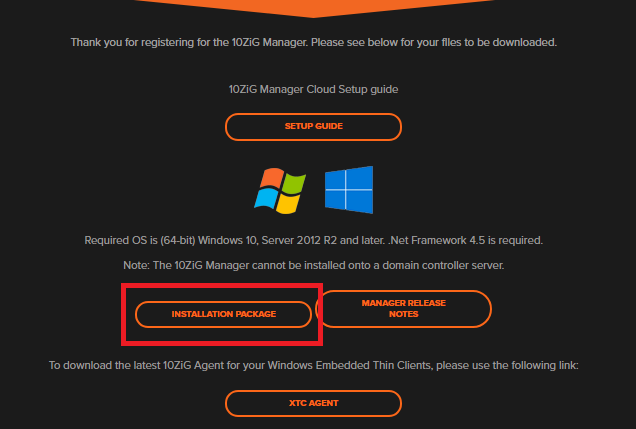
Click INSTALLATION PACKAGE, as shown in Figure 14.
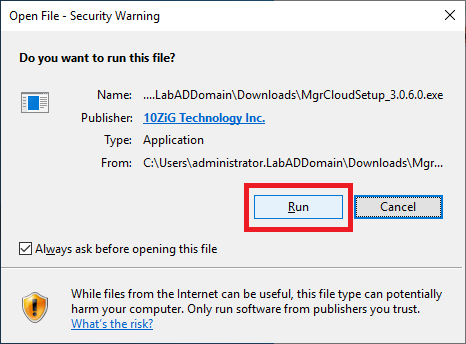
Double-click the downloaded installer, as shown in Figure 15.
Note: The filename may be different for you as the software is continually updated.

Click Run, as shown in Figure 16.
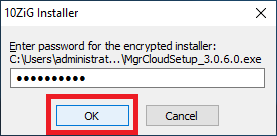
Type in the password given in the email and click OK, as shown in Figure 17.
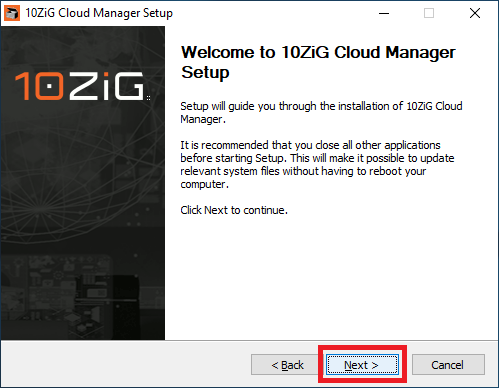
Click Next, as shown in Figure 18.
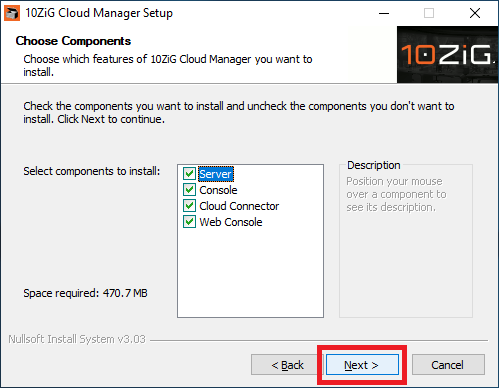
Leave all components selected and click Next, as shown in Figure 19.
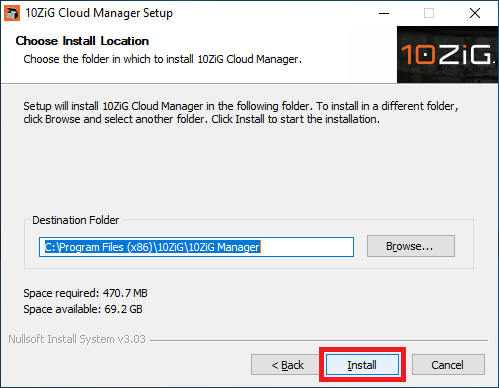
Click Install, as shown in Figure 20.
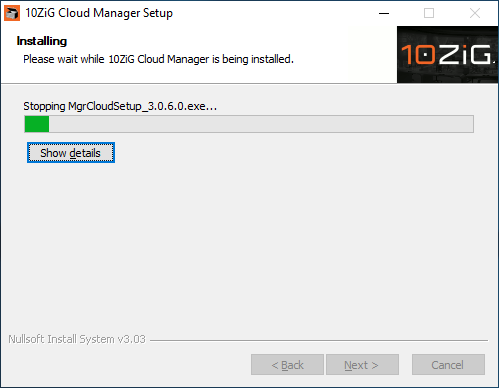
The installation begins, as shown in Figure 21.
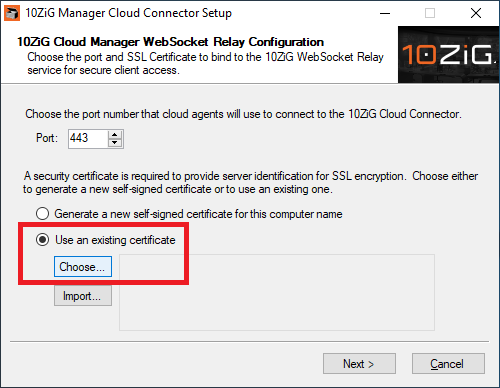
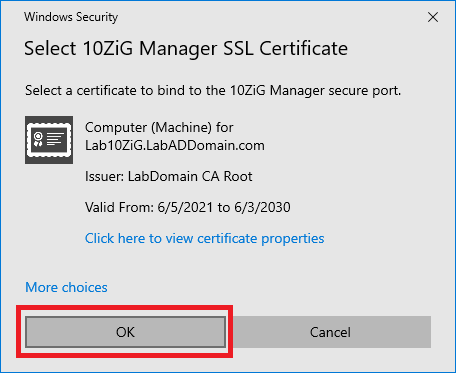
Because we have a computer certificate from the domain’s Certificate Authority, select Use an existing certificate and click Choose…, as shown in Figure 22.
Click OK, as shown in Figure 23.
Click Next, as shown in Figure 24.

Click Next, as shown in Figure 25.
Click Install, as shown in Figure 26.

Click Yes, as shown in Figure 27.
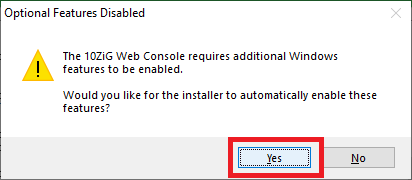
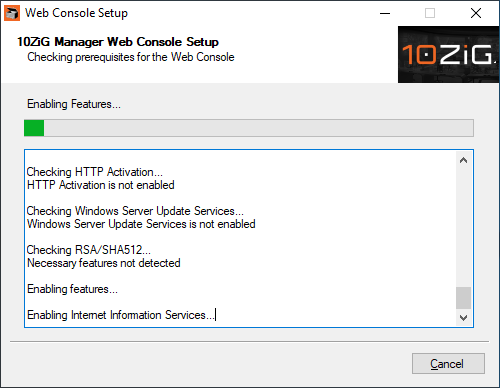
The installation continues, as shown in Figure 28.
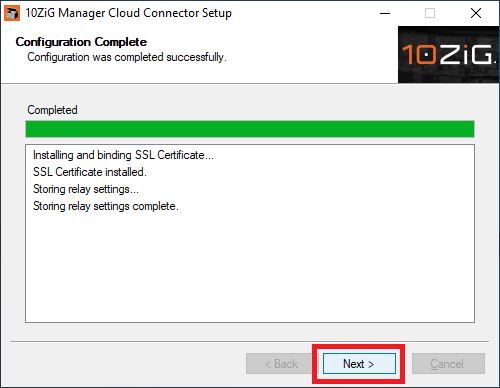
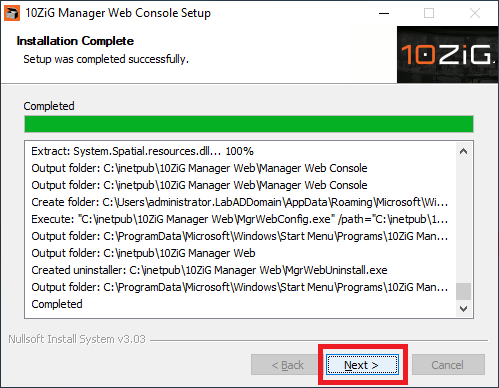
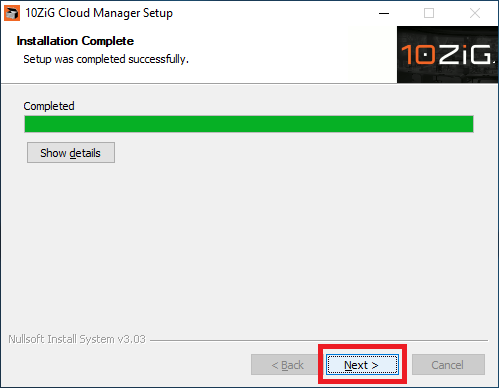
After several minutes, the installation is almost complete. Click Next, as shown in Figure 29.
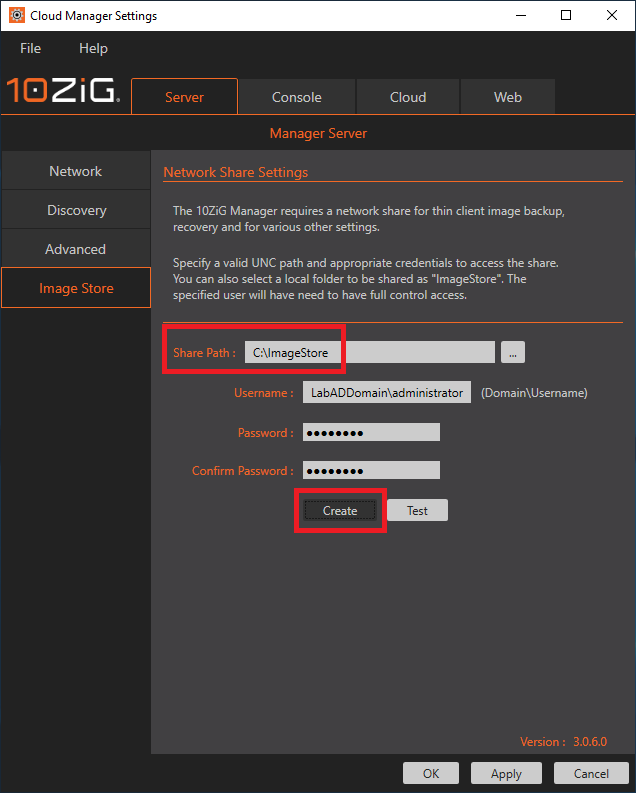
Type in C:\ImageStore for the Share Path, enter the domain’s administrator credentials and click Create, as shown in Figure 30.
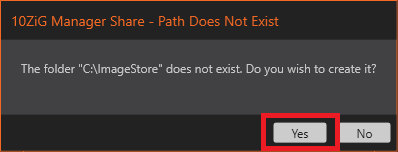
Click Yes to create the C:\ImageStore folder, as shown in Figure 31.
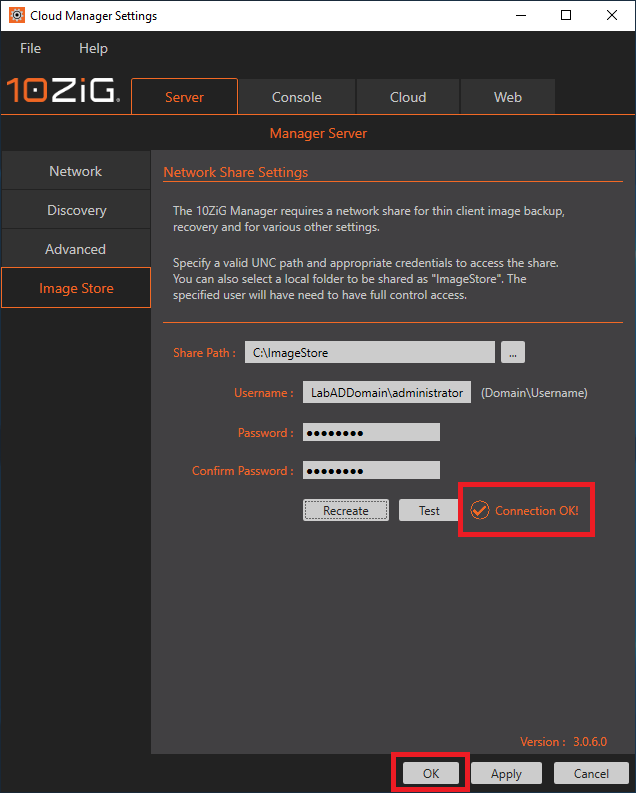
The C:\ImageStore folder and share are created. Click OK, as shown in Figure 32.
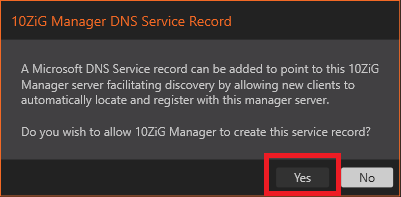
Click Yes, to allow 10ZiG to create a DNS record making your life easier, as shown in Figure 33.
Click Next, as shown in Figure 34.
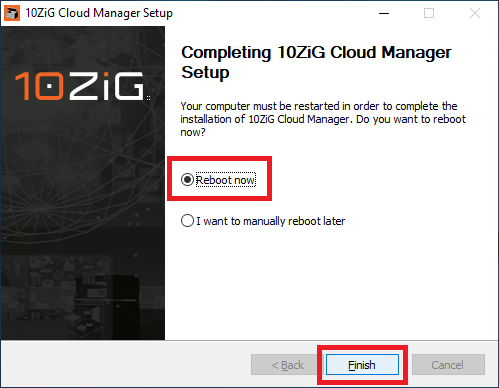
Select Reboot now and click Finish, as shown in Figure 35.
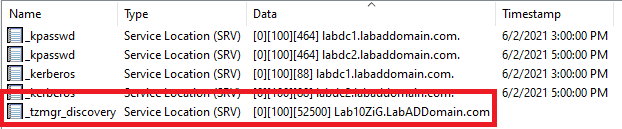
Let’s verify that the installation created a DNS SRV record.
Note: What is a DNS SRV record? An SRV record is a type of information record in DNS that maps the name of a service to a server’s DNS name that offers that service. Domain controllers advertise their capabilities by publishing SRV records in DNS.
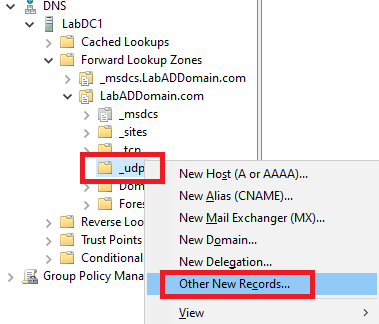
On the lab management computer, open the DNS console, expand the DNS server, expand Forward Lookup Zones, expand your DNS domain, and click on _udp, as shown in Figure 36. We should see in the right pane an SRV record with the name _tzmgr_discovery.
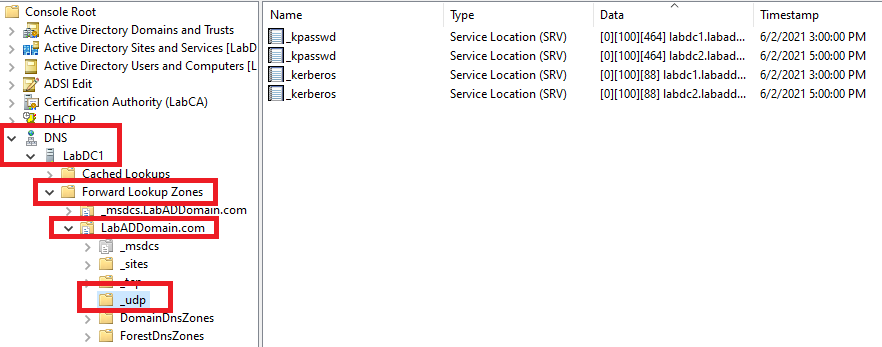
OOPS, it’s not there. There is nothing to worry about, as creating the SRV record is simple.
If you click the _tcp node, the SRV record is also not there.
Right-click the _udp node in the DNS console and click Other New Records…, as shown in Figure 37.
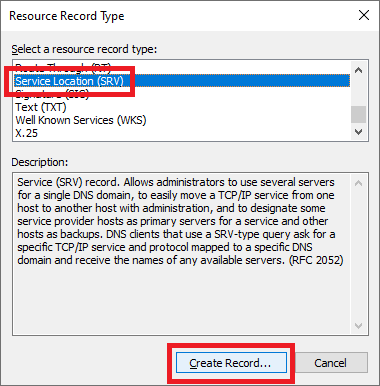
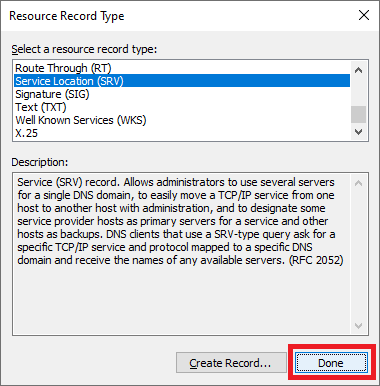
Scroll down, click Service Location (SRV), and click Create Record…, as shown in Figure 38.
Type in the following information and click OK, as shown in Figure 39.
- Service: _tzmgr_discovery
- Protocol: _udp
- Priority: 0
- Weight: 100
- Port number: 52500
- Host offering this service: LabADDomain.com (the FQDN of your 10ZiG server)
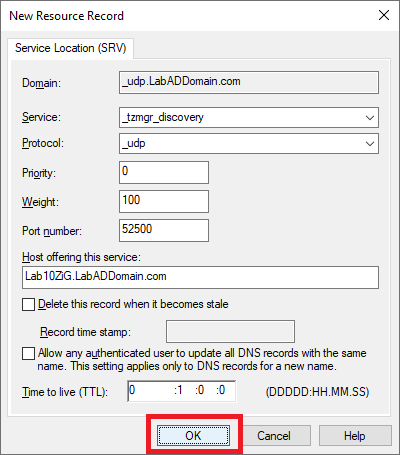
Click Done, as shown in Figure 40.
The SRV record is now in DNS, as shown in Figure 41.
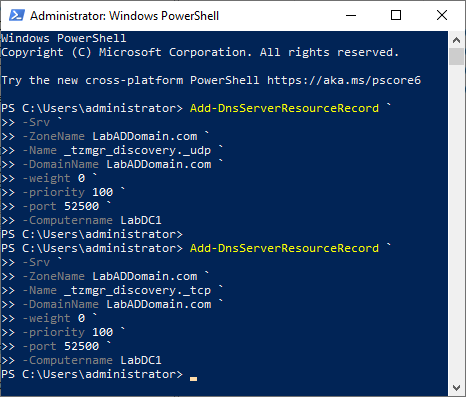
Repeat the process for the _tcp node, but use _tcp for the Protocol.
Of course, you can also do the same thing in PowerShell, as shown in Figure 42.
Add-DnsServerResourceRecord `
-Srv `
-ZoneName LabADDomain.com `
-Name _tzmgr_discovery._udp `
-DomainName LabADDomain.com `
-weight 0 `
-priority 100 `
-port 52500 `
-Computername LabDC1

Add-DnsServerResourceRecord `
-Srv `
-ZoneName LabADDomain.com `
-Name _tzmgr_discovery._tcp `
-DomainName LabADDomain.com `
-weight 0 `
-priority 100 `
-port 52500 `
-Computername LabDC1
Configuring 10ZiG Devices
Once you receive the 10ZiG device(s), connect them to your network and start the 10ZiG Manager Console by double-clicking the 10ZiG Manager Console icon on the server’s desktop, as shown in Figure 43.

You can see the two devices 10ZiG sent me in the console, as shown in Figure 44.
The top device uses WiFi, and the bottom device connects via an ethernet cable.

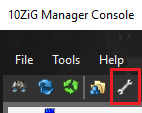
If your devices do not show, click the wrench icon on the toolbar, as shown in Figure 45.
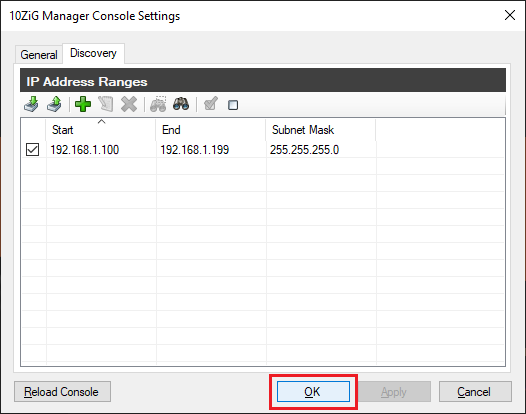
Click the Discovery tab and click the “+” symbol, as shown in Figure 46.
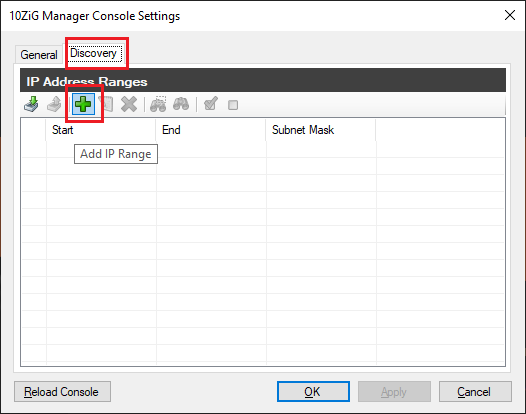
Enter the IP Range to search and click Save, as shown in Figure 47. I am using the scope range from my DHCP server since all thin clients receive an IP address from the DHCP server, as shown in Figure 48.


The first thing I want to do is make sure the devices have the current firmware.
You can browse to 10ZiG.com and search for “firmware” or browse to https://www.10zig.com/resources/firmware, as shown in Figure 50.
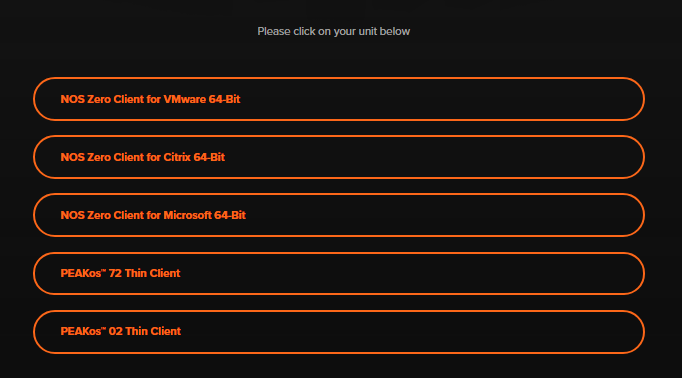
I downloaded the NOS Zero Client for Citrix 64-Bit firmware update.
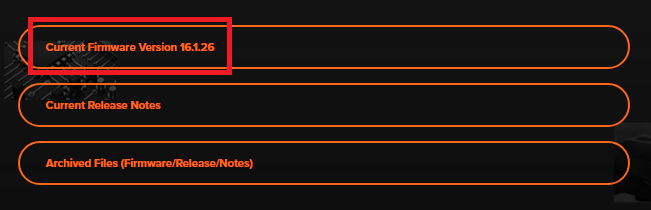
Click the firmware update needed, and another page is displayed. Click the link to download the Current Firmware Version, as shown in Figure 51.
Note: 10ZiG continually updates firmware, so the version numbers can differ.
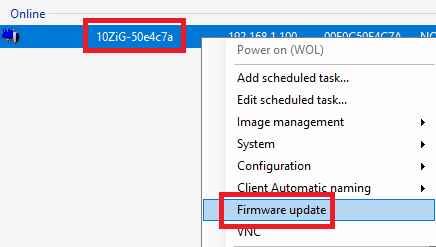
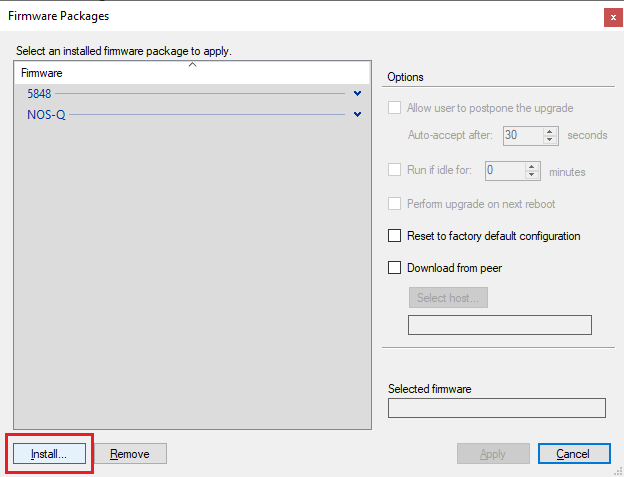
Right-click the device and click Firmware update, as shown in Figure 52.
Click Install…, as shown in Figure 53.
Select the just downloaded firmware file and click Open, as shown in Figure 54.

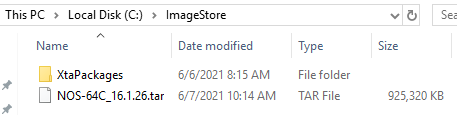
The firmware file was copied to C:\ImageStore and installed in the console, as shown in Figures 55 and 56.
The new firmware is now in the Firmware file list. Select the new firmware file and click Apply, as shown in Figure 57.
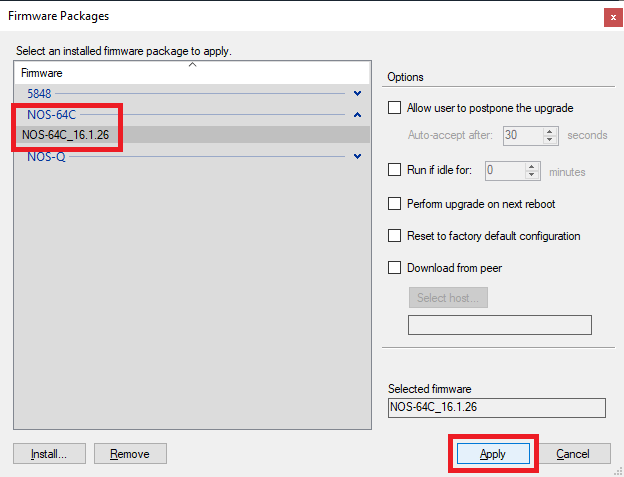
Click OK, as shown in Figure 58.
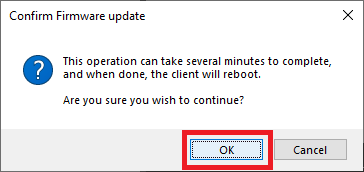
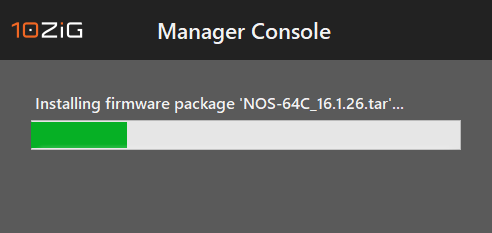
The firmware update installs, the 10ZiG device reboots, and the console shows the updated firmware version, as shown in Figure 59.

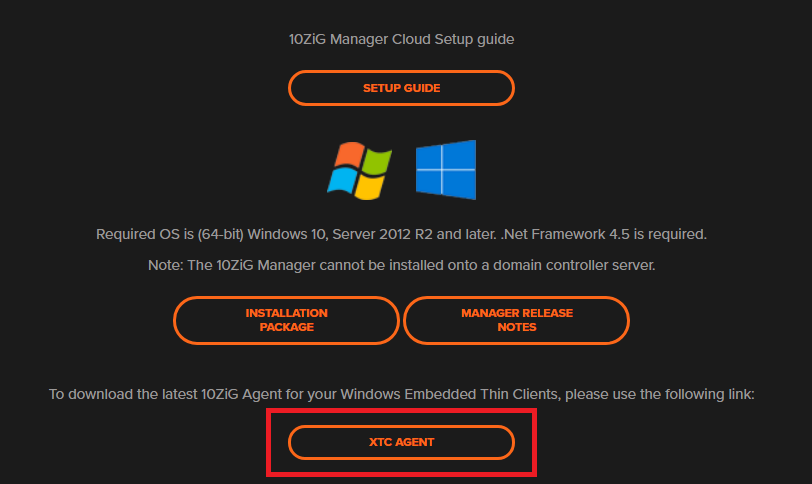
To update the client on a 10ZiG Windows 10 IoT thin client, browse to https://www.10zig.com/resources/10-zig-manager/10zig-manager-download-instructions.
Click XTC AGENT, as shown in Figure 60.
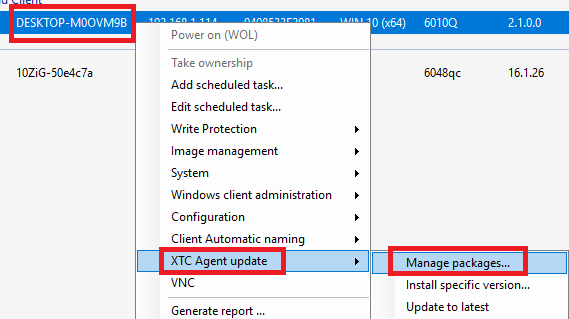
After the XTC Agent downloads, right-click the Windows 10 IoT thin client, click XTC Agent update, and click Manage packages…, as shown in Figure 61.
Click Add, as shown in Figure 62.
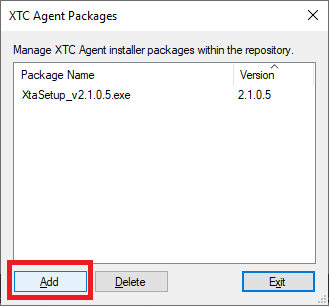
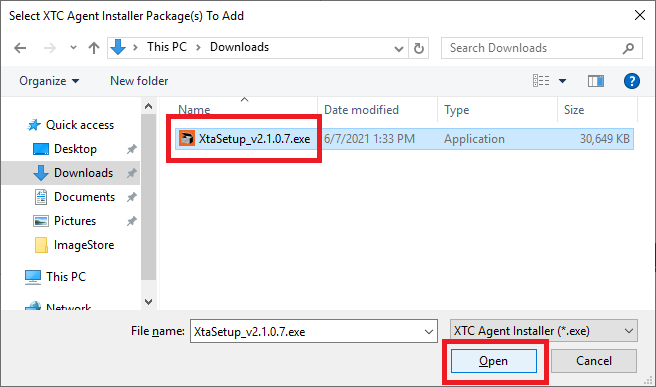
Browse to the folder containing the XTC Agent download, click the file, and click Open, as shown in Figure 63.
Note: File version numbers can differ.
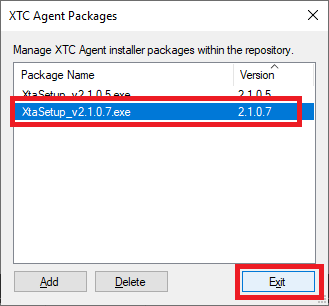
The file is copied to C:\ImageStore\XtaPackages, as shown in Figure 64.

The file shows in the list of XTC Agent installer packages. Click Exit, as shown in Figure 65.
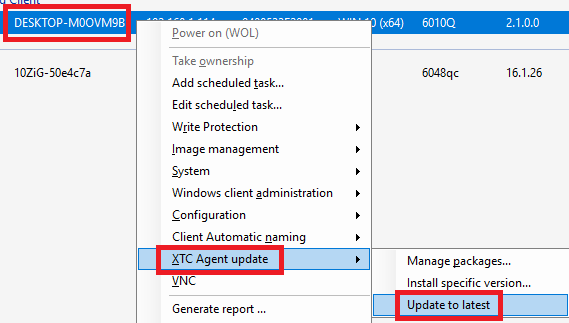
Right-click the Windows 10 IoT thin client, click XTC Agent update, and click Update to latest, as shown in Figure 66.
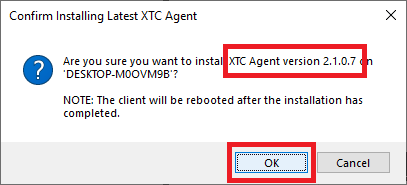
Verify that the agent version displayed in the popup is the same as the downloaded file and click OK, as shown in Figure 67.
The firmware update installs, the 10ZiG device reboots, and the console shows the updated agent version, as shown in Figure 68.

Using the 10ZiG Web Console
As part of the 10ZiG Management Console installation, the new Web Console was part of the installation.
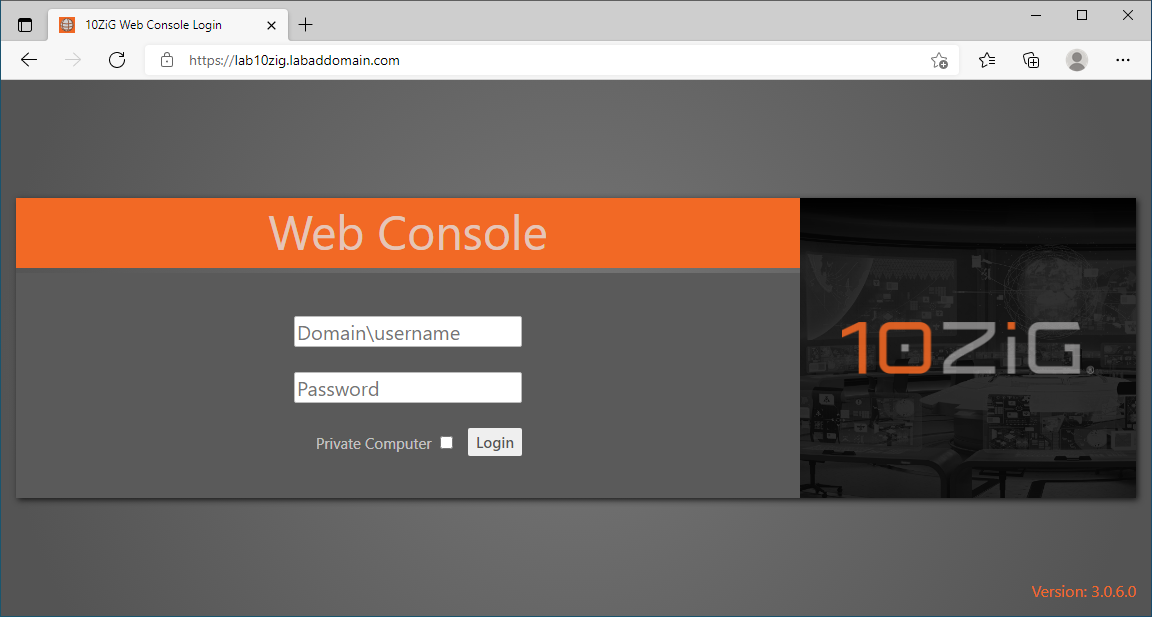
From the Lab Management computer, browse to https://<10ZiG Server FQDN>. For me, that is https://Lab10ZiG.LabADDomain.com, as shown in Figure 69.
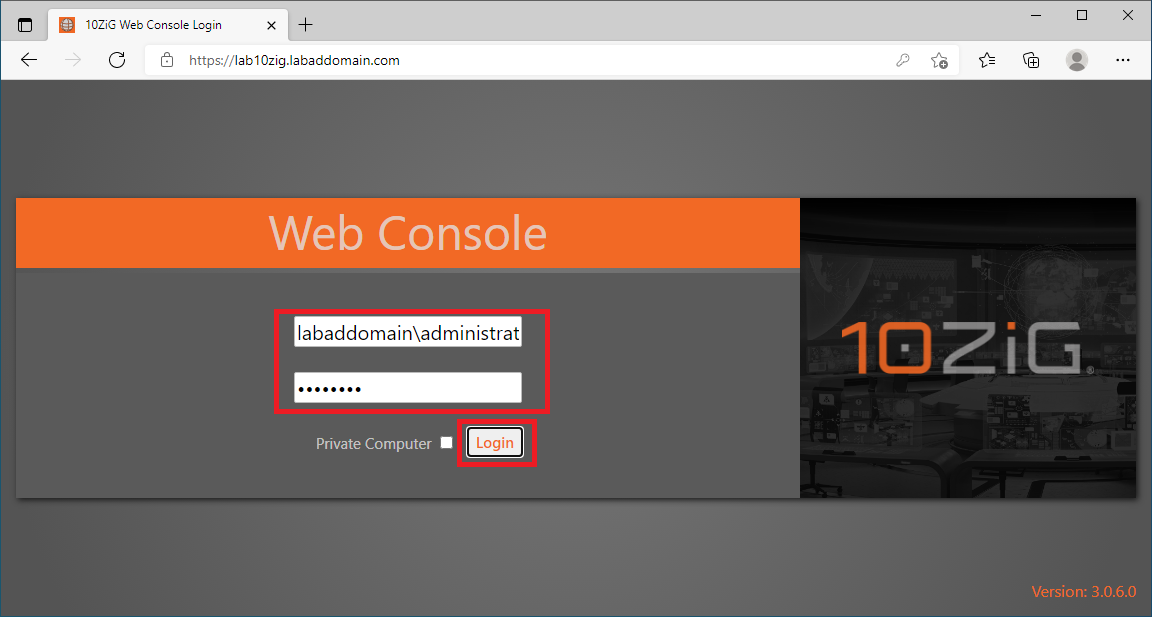
Enter the domain’s administrator credential and click Login, as shown in Figure 70.
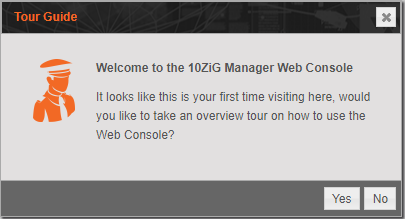
Decide whether to take the “First-time use tour”, as shown in Figure 71. I took the tour, and it was thorough.
The web console loads, as shown in Figure 72.
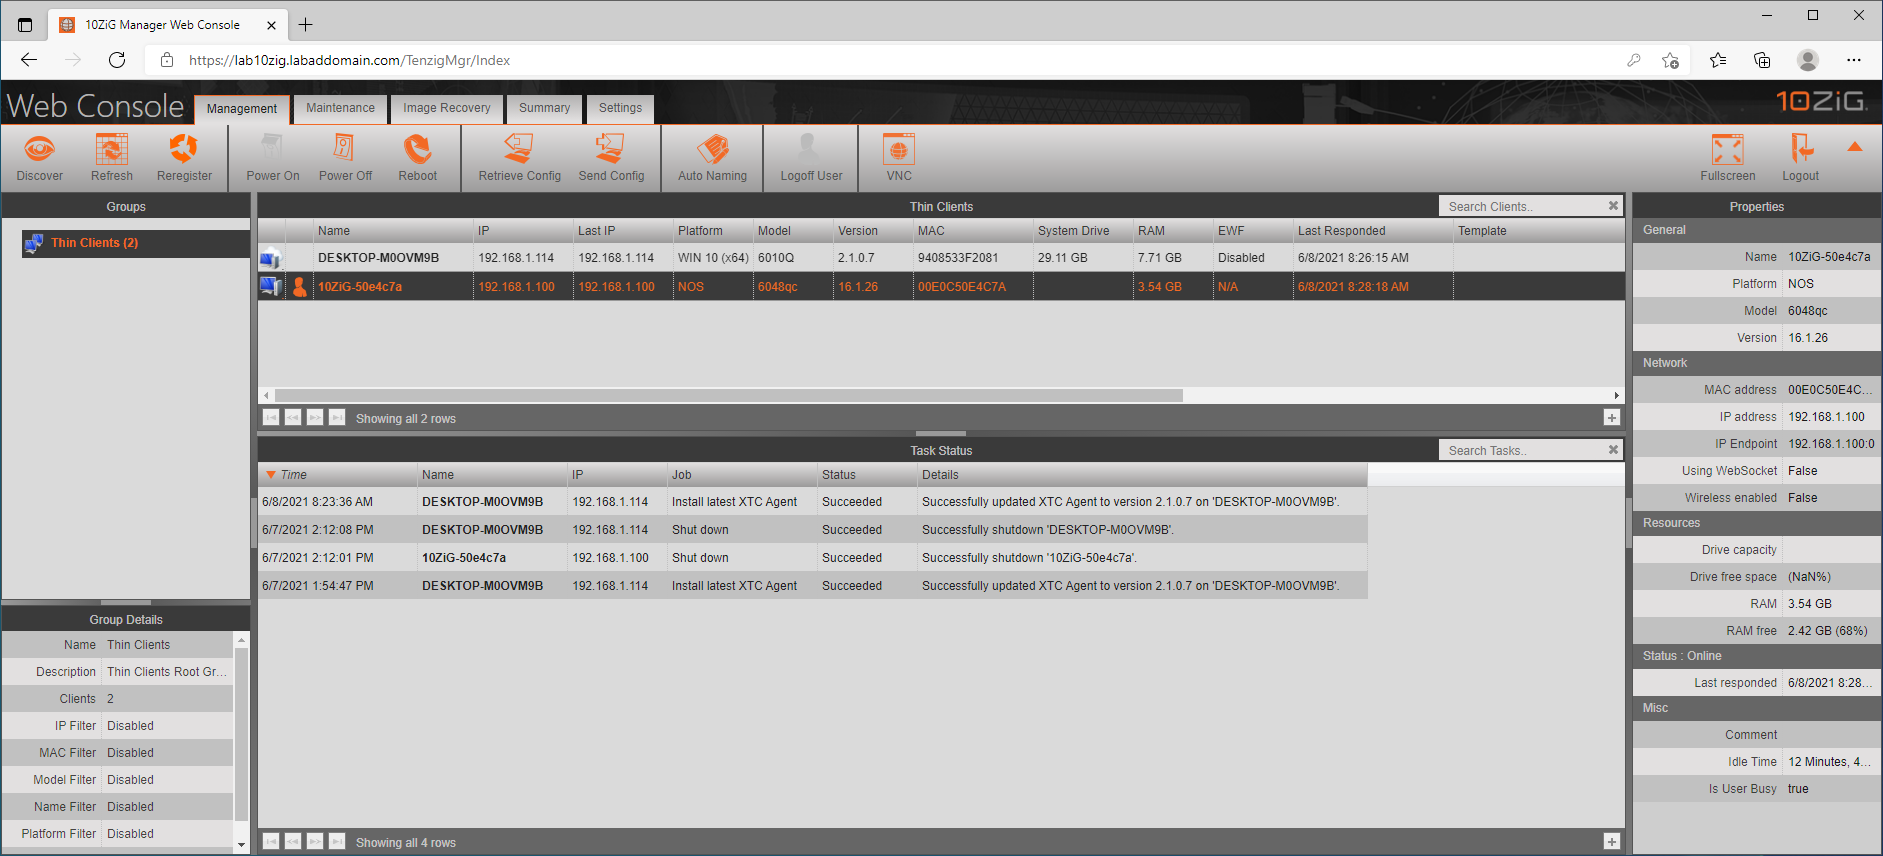
I prefer web consoles, as they allow management from any network-connected device with a browser installed.
Play around with the 10ZiG Web Console. I did not find anything I could do in the full console in my testing that I could not do in the Web Console.
The 10ZiG server and thin clients are ready for use.